Rendering
To achieve the desired 4K quality for my large file, I opted to use the high-speed ‘Viper render farm’ instead of using a local PC for rendering each scene. This required me to add the ‘Viper shelf’ to my local files in Maya, which allowed me to connect to the render farm remotely. Once connected, I exported the completed scene along with any relevant source images to a secure folder. The Viper render farm then utilised the exported .ass files to generate a high-quality 4K render in a much shorter timeframe compared to remote rendering. Upon completion, I would be sent an email with a link to download my 360 video file which is then imported into my chosen editing software to add any audio, effects as well as converting the mp4 file into a recognisable format for YouTube to display as a full 360 video.
To avoid potential issues with the final 360 video, there was a few things I needed to consider before sending off the render. Firstly, I made sure that the camera was set to a VR camera to capture an entire 360 degree view, including above and below. I also confirmed that the camera mode was set to ‘over_under’, which is crucial for the editing software to properly recognise the video as a VR product. Next, I adjusted some settings within the render settings panel. I made sure to select the VR camera I had created, as using the perspective camera would result in a non-360 render. Additionally, I selected ‘4K square’ as the image size for a high-quality 360 video, and changed the frame/animation extension to ‘name_#.ext’. Finally, in the system panel of the render settings, I selected CPU to ensure that the Viper farm was used for rendering instead of relying on the local computer power.
Once we apply these settings, we are ready to start rendering. To ensure a successful rendering process, we need to navigate through all the Viper tabs and verify that the export location includes a folder named ‘sourceimages’, which must contain all the required textures or images for the render. After verifying this, we just need to ensure that the colour manager is turned off and set the desired frame range before submitting the render to the Viper farm.
Editing
The chosen software for editing was Adobe Premiere as it was quick and easy to organise the render files, audio clips and add any desired effects to the video. This was also perfect for including the fade to black transitions between each scene (in relation to the digital affordance research)
The editing process once receiving the renders back was pretty straightforward as all I needed to do was insert my audio clips to the correct position on the timeline, as well as add any effects I wanted in my final video and then the video would be ready to export for YouTube. To help view the video in VR to make sure nothing was wrong with the render, Premiere has a feature where you can see the 360 video and move around as if it was already exported. To do this I navigated to the wrench icon below the preview window and enabled VR mode. This just helps as it allowed me to spot any possible mistakes that may have occurred before the render or during the render.
Once exported, it was as simple as uploading any other YouTube video as the VR capability was already embedded within the video which was then automatically converted by YouTube in order to display it.
Troubleshooting
Fortunately, I had no major issues when using the render farm which meant that I was able to get my renders sent off and received in a short amount of time. The only issue I had when rendering was simply incorrect naming of the ‘sourceimages’ folder which meant the render was never exported. However this was an easy fix once found and never caused any issues going forward.
Unfortunately, the editing process caused a lot of issues when trying to export to YouTube. From following the instructions, I only changed the project to VR and made sure the mode was set to Over/Under (to match the render). However this caused a range of issues once the video was uploaded to YouTube such as poor quality, incorrect dimensions (uploading vertical as YouTube short instead of a widescreen VR video) as well a simply not converting to a 360 video.
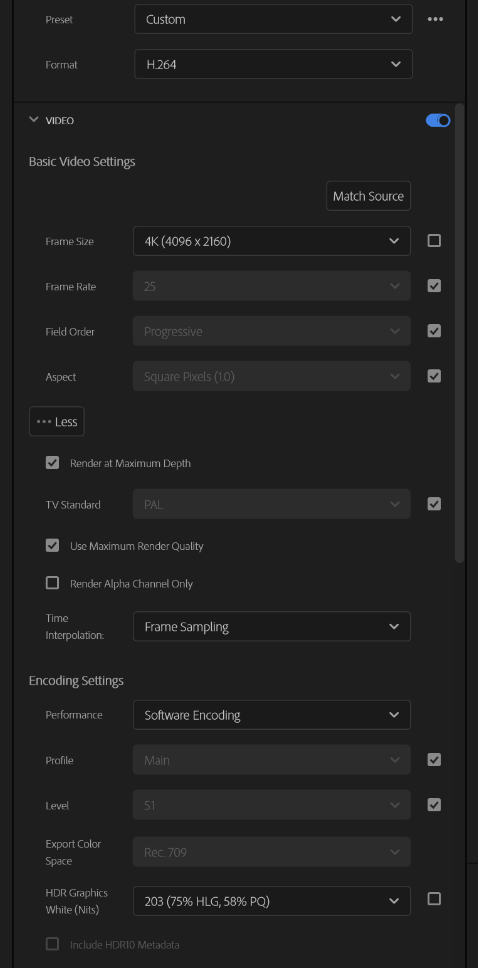
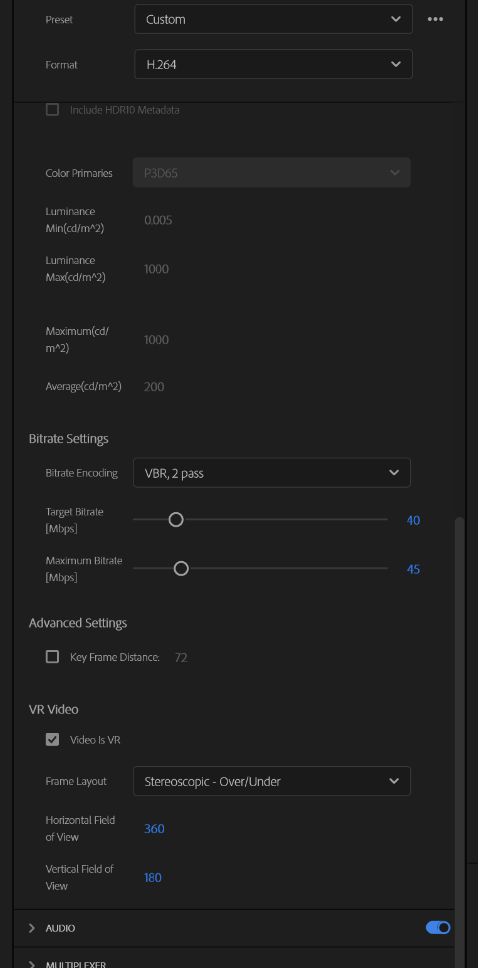
After many hours of testing different settings and techniques, I finally managed to create a list of settings that needed to be selected in order to get the correct resolution, size as well as a full 360 video. These were settings that I was also able to share with my classmates as this seemed to be a problem for everyone, not just myself. Below is the settings I found needed to be enabled:
- Untick “Match Source” for Frame Size and Select 4K Wide Screen (4096 x 2160), (This prevents the video uploading as a YouTube short, while still maintaining the 4K resolution.
- Set the Scaling to “Stretch to Fill” (So the video is a full 360, not 180)
- Select Render at Max Depth and Use Max Render Quality
- Under “Bitrate Settings” Set the Encoding to VBR, 2Pass, Target Bitrate to 40 and Max Bitrate to 45 (This is so once the video processes on YouTube’s end, the video is not blurry for the first few seconds, or throughout as the bitrate needed for YouTube is matched)